Save the Dates
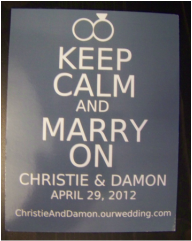
Another Knot-inspired project. Created in Photoshop, printed through Vistaprint, as a postcard. I would have liked to have printed them with a matte finish but D preferred the glossy, and he gives so little input that I try to accomodate as much as possible.
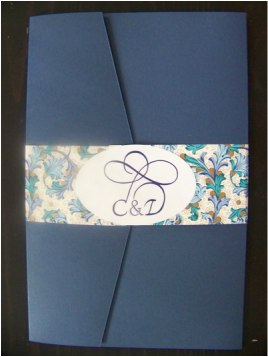
Ta-da! Invites

1. I started with custom-cut cardstock in cobalt from cardsandpockets.com, measured at 8.75x14.75 ($0.82/sheet). In this photo, its hard to make out, but I have scored the cardstock at 4" and at 9.75", using a scoring attachment on my Cricut paper trimmer.
2. Because of how many pockets I needed to create, I found it was easier to create one template pocket, then use it to mark the trimmer with tape to expedite the actual scoring and cutting process. This photo shows the actual pocket piece being cut from the rest of the pocketfold.
3. I chose to make this type of pocketfold because it required minimal cuts and I like the pointed flap, versus creating a pocketfold that requires no cutting but has a straight pocket and flap.
4. I used Recollections permanent adhesive sheets and trimmed them into strips about 1/8" wide myself, it was less expensive this way but in hindsight, cutting the adhesive was a PITA and I should have shelled out the extra two bucks. I taped around the edges of the pocket piece.
5. Its hard to see in this photo, but the pocket has been mounted on to the side of the envelope here.
6. Here, I have mounted the invite panel to the center panel of the pocketfold. The invite panel is a 6x9" flat invitation from Vistaprint, on linen paper. The enclosures in the pocket are rack cards, from VP as well. The second enclosure will be trimmed approximately 1/2" on one long side to stagger the cards in the pocket.
7. I cut belly bands myself using large sheets of decorative paper from Paper Source ($4/sheet); three sheets made enough belly bands for all 60 invites. I used a stripe from a glue stick to secure the belly band to the back of the pocketfold.
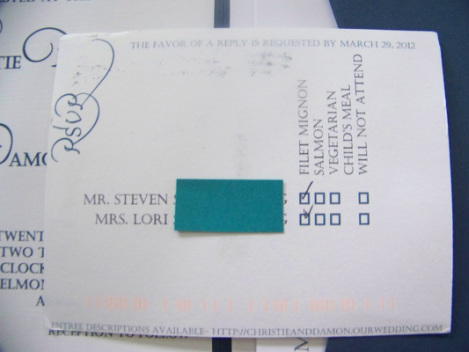
8. I used the large oval stickers from VP for my envelope seals. The first time I ordered them I didn't like the glossy finish and the design didn't align right on the small round seals. These turned out much better. I ordered postcards with all of the border text and the return address printed on the reverse side. I created a powerpoint image for each individual RSVP and printed them onto the postcards using my photo printer at home. The customized RSVPs should eliminate any issues of extra RSVP's or any confusion with entree selection.
2. Because of how many pockets I needed to create, I found it was easier to create one template pocket, then use it to mark the trimmer with tape to expedite the actual scoring and cutting process. This photo shows the actual pocket piece being cut from the rest of the pocketfold.
3. I chose to make this type of pocketfold because it required minimal cuts and I like the pointed flap, versus creating a pocketfold that requires no cutting but has a straight pocket and flap.
4. I used Recollections permanent adhesive sheets and trimmed them into strips about 1/8" wide myself, it was less expensive this way but in hindsight, cutting the adhesive was a PITA and I should have shelled out the extra two bucks. I taped around the edges of the pocket piece.
5. Its hard to see in this photo, but the pocket has been mounted on to the side of the envelope here.
6. Here, I have mounted the invite panel to the center panel of the pocketfold. The invite panel is a 6x9" flat invitation from Vistaprint, on linen paper. The enclosures in the pocket are rack cards, from VP as well. The second enclosure will be trimmed approximately 1/2" on one long side to stagger the cards in the pocket.
7. I cut belly bands myself using large sheets of decorative paper from Paper Source ($4/sheet); three sheets made enough belly bands for all 60 invites. I used a stripe from a glue stick to secure the belly band to the back of the pocketfold.
8. I used the large oval stickers from VP for my envelope seals. The first time I ordered them I didn't like the glossy finish and the design didn't align right on the small round seals. These turned out much better. I ordered postcards with all of the border text and the return address printed on the reverse side. I created a powerpoint image for each individual RSVP and printed them onto the postcards using my photo printer at home. The customized RSVPs should eliminate any issues of extra RSVP's or any confusion with entree selection.
|
|
